Station graphics and coding tutorial for dummies

Discuss, get help with, or post new graphics for TTDPatch and OpenTTD, using the NewGRF system, here. Graphics for plain TTD also acceptable here.

Moderator: Graphics Moderators

User avatar
Quast65
Tycoon
Tycoon
Posts: 2664
Joined: 09 Oct 2011 13:51
Location: The Netherlands

Station graphics and coding tutorial for dummies

Post by Quast65 »

Maybe this information has already been posted, but as far as I know there is not yet a tutorial that combines drawing stationtiles and also coding them.
That is why I wrote this tutorial. Please note that I am not a coding expert ;-) Therefor not all information is complete and some might be incorrect. Anyone who can help is very welcome to do so.

I have no experience in drawing and coding multitile stations, so I will only focus on single tile stations. If anyone wants to contribute tips and tricks
for drawing and coding multitile stations, please do! Also all of this is what looks and works best in my opinion, you don’t need to follow my exact
instructions. Feel free to experiment!

Let's start first with drawing stationtiles.

Basically you’ll have to provide 4 sprites, a background and foreground sprite for the East-West diagonal and the same for the North-South diagonal. You can find a bit more info here: http://www.ttdpatch.de/grfspecs/Station ... orial.html
You don’t need to worry about railtypes and catenary, that basetile will be provided in the code, so you don’t have to draw that. Just keep the place where the rails will be transparant and it will be placed there automatically. I’ll come back to that later.

I always use the same base sprites to start drawing, this makes coding also a lot easier. I’ll also come back to that later.
These are my base sprites:
01basesprites.pcx
(4.04 KiB) Downloaded 780 times
The white basetile is my reference point. So that I know where I have to place my graphics. When I’m finished drawing what I want, I can easily see what is left of the basetile and just change that white into the blue that makes it transparent.
You are off course free to make your own basesprites, just be aware that the maximum hight is 255 pixels!

You can’t use all the colors of the rainbow when drawing ;-) Openttd has a limited palette of colors, you can find those colors and a bit more info here: http://www.ttdpatch.de/grfspecs/Palette ... nates.html
I mostly use the colors of the DOS palette, as they have a bit more options especially in the grey tone area.

Right, now lets draw something. In this instance I will only draw 2 simple blocks, just to give an idea about what room you should leave open for the
railtracks. I usually make my platforms 5 pixels wide, so that leaves 6 pixels for the railtrack (a tile is 16 pixels wide), the rails are usually about 4
pixels apart from each other, so that leaves about 1 pixel of ballast on each side before you get a platform. This looks in my opinion the best.

My foreground block is green, the background one is red. The dimensions of these blocks are 3 pixels high, 5 wide and 16 long. I have also shaded the blocks, so you have a bit of an idea about how the light falls in the OTTD world. After I have drawn the blocks I recolor what is left of the white basetile into the transparent blue, so you get this:
02blocks.pcx
(4.11 KiB) Downloaded 461 times
Which looks like this in game, as you can see there is enough room for the rails and the trains look correct when they drive through the stationtile:
ingame.png
ingame.png (25.01 KiB) Viewed 15138 times
Basically that is all there is to drawing. It is all up to your imagination to create nice stationtiles. Just be aware that if you want to draw stuff that
goes over the rails (like an overpass) that you have to draw the parts that will obscure the traingraphics on the foreground sprite and that those things have to be about 8 pixels high, or the trains will run through them and not under them ;-)
Last edited by Quast65 on 05 Aug 2012 20:37, edited 1 time in total.
Projects: http://www.tt-forums.net/viewtopic.php?f=26&t=57266
Screenshots: http://www.tt-forums.net/viewtopic.php?f=47&t=56959
Scenario of The Netherlands: viewtopic.php?f=60&t=87604

Winner of the following screenshot competitions:
sep 2012, jan 2013, apr 2013, aug 2013, mar 2014, mar 2016, oct 2020
All my work is released under GPL-license (either V2 or V3), if not clearly stated otherwise.
User avatar
Quast65
Tycoon
Tycoon
Posts: 2664
Joined: 09 Oct 2011 13:51
Location: The Netherlands

Re: Station graphics and coding tutorial for dummies

Post by Quast65 »

And now we come to what is the tricky part, the coding ;-) You can find more elaborate info about NFO coding here:
http://newgrf-specs.tt-wiki.net/wiki/Main_Page
Here you can find loads more info about what attributes you can give to your GRF, but right now we focus on just a simple stationtile.

This is the code I used to create the stationtiles in the pictures above:

Code: Select all

// Automatically generated by GRFCODEC. Do not modify!
// (Info version 7)
// Format: spritenum pcxfile xpos ypos compression ysize xsize xrel yrel    
    0 * 4	 0C 00 00 00
    1 * 38	 08 07 "PJ" 00 00 "Tutorial version 0.0" 00
	 "By Quast65" 00
    2 * 6	 01 04 01 FF 04 00
    3 c:\grfmaken\grfcodecwin\tutorial\tutorial.pcx 8 7 01 122 64 -31 -91
    4 c:\grfmaken\grfcodecwin\tutorial\tutorial.pcx 88 7 01 122 64 -31 -91
    5 c:\grfmaken\grfcodecwin\tutorial\tutorial.pcx 168 7 01 122 64 -31 -91
    6 c:\grfmaken\grfcodecwin\tutorial\tutorial.pcx 248 7 01 122 64 -31 -91
    7 * 62	 00 04 02 01 00 08 "TUT0" 09 02 F4 03 00 00 00 00 00 10 05 03 2D 84 00 00 00 00 00 10 10 7A 2E 84 00 00 80 F3 03 00 00 00 00 00
 05 10 03 2F 84 00 00 00 00 00 10 10 7A 30 84 00 00 80
    8 * 7	 02 04 00 00 01 00 00
    9 * 7	 02 04 01 00 01 00 00
   10 * 10	 03 04 01 00 01 FE 01 00 00 00
   11 * 25	 04 48 FF 01 00 "ÅBasic station tile" 00
   12 * 15	 04 48 FF 01 00 "ÄTutorial" 00
Yep, it looks like a lot of numbers and letters that look like a lot of gibberish, but I will explain it so it will make more sense so you can make your own code.

First of all you need a text programme to write this all in, notepad will do. Open notepad and save it as a .nfo file. In this case I named it tutorial.nfo, but you can name it as you want. Normally you give it your projectname and also include a versionnumber so that you know what is what when you have made loads more of these ;-) Just make sure that you don't have any spaces in the name! GRFcodec (the programme that you will use to eventually make the GRF) will not work with spaces in the name, just use _ in stead of a space.

Right, lets explain that code a bit:

Code: Select all

// Automatically generated by GRFCODEC. Do not modify!
// (Info version 7)
// Format: spritenum pcxfile xpos ypos compression ysize xsize xrel yrel
This is a standard text that has to be at the start of every .nfo, GRFcodec will not work without this!
Just copy paste this to every new .nfo

Now we get to the actual code part:

Code: Select all

0 * 4	 0C 00 00 00
You always start with spritenumber 0 and on that line you give the information about how many lines of code are in the .nfo. In this case there are 12 lines of code, which you have to give as a hexadecimal number, 12 is 0C in hexadecimal. This online converter is what I usually use:
http://www.statman.info/conversions/hexadecimal.html
But basically this is how you count in hexadecimal: 0, 1, 2, 3, 4, 5, 6, 7, 8, 9, 0A, 0B, 0C, 0D, 0E, 0F, 10, 11, 12, 13, 14, 15, 16, 17, 18, 19, 1A, 1B and so on.

So what does this line say:

0 = pseudospritenumber
4 = how many bytes there are in this line. Right now they are easy to count, this will get trickier later on. But have no fear, GRFcodec will give a warning when this number is incorrect and will tell you the right number. So just change the number then and let GRFcodec run again until you don't have any warnings any more. So you don't have to count long lines yourself ;-)
0C 00 00 00 = how many lines of code there are in this .nfo

This is not that difficult right? You only have to change the byte with the number of lines of code as you make your .nfo larger. Up to 255 lines it is not that difficult, after that it gets a bit trickier, because you will have to change 2 bytes then. But you will have drawn a lot of stationtiles before you get to that ;-) I'll explain how that works with the hexadecimal converter later in this thread. It is not that important right now.

Righto, next line of code:

Code: Select all

1 * 38	 08 07 "PJ" 00 00 "Tutorial Version 0.0" 00	 "By Quast65" 00
In this line you'll provide the information about your GRF, the GRF-ID, Name and Description

1 = pseudospritenumber
38 = how many bytes there are in this line
08 = action 8
07 = NFO versionnumber, has to be the same number as the one you gave at the standard text at the top of your NFO. Basically this number gives information about which version of Openttd it is compatible with. Make sure to set a version number no lower than the minimum version that supports all features which are used by your file. Right now version 7 is the most modern one.
"PJ" 00 00 = the GRF-ID, This is a series of 4 bytes. It's a convention to use the first two bytes for the creator's initials (in my case PJ). The last two
bytes should be numbers, typically the first number identifying which of the author's sets this is, and the second number being a version number.
In principle, you are free what to use for the GRF ID as long as you are sure it is unique, but generally it is best to follow the above guidelines. However if you release new versions of your GRF it is best to keep the same GRF-ID and just change the name of the GRF. This is better if anyone wants to update your GRF in a running game. So to make a long story short, choose a GRF-ID and stick to that ;-)
"Tutorial Version 0.0" = A short text containing the name of this set, this is the name that you will see in the new-GRF menu. If you update your GRF (for instance you have added more stationtiles), change the versionnumber.
"By Quast65" = A longer description of this set. This will show up on the right of the new-GRF menu if you select this GRF. You can provide an elaborate description of what this GRF is about here.

Woohoo, 2 lines down, 10 to go ;-)

Code: Select all

2 * 6	 01 04 01 FF 04 00
This line defines a set of new sprites, it is not really necessary to go deep into what this all means (basically the first 04 means that it is a station and the second 04 that it has 4 views), if you want to read more about it just look for action1 in the NFO reference of which I gave the URL earlier. When you add more stationtiles you'll have to repeat this line, but you don't have to change anything in it.

Next!

Code: Select all

3 c:\grfmaken\grfcodecwin\tutorial\tutorial.pcx 8 7 01 122 64 -31 -91
Now it is getting interesting, this is where you define where the NFO can find the pretty graphics you have drawn ;-)

3 = pseudospritenumber
c:\grfmaken\grfcodecwin\tutorial\tutorial.pcx = the location of your graphics file. You will need to change this to where your file is located, again make sure there are no spaces in the foldernames and the filename!!
8 7 = the X and Y position of the upperleft corner of the sprite in your graphicsfile. I usually use Photoshop to make my graphics and I can find that
information by placing my pointer on the upperleft corner:
position.png
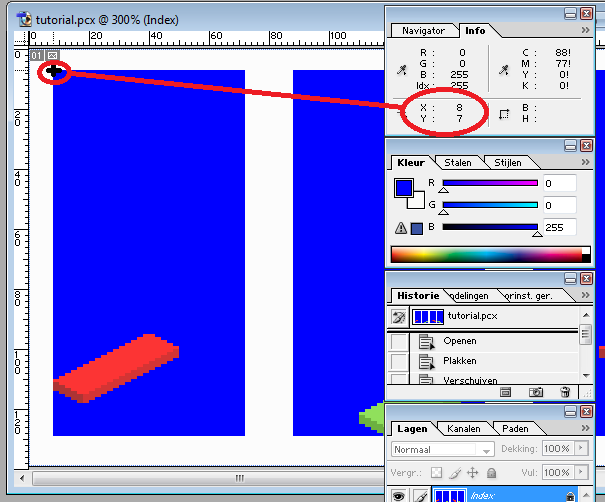
position.png (38.13 KiB) Viewed 15122 times
You will have to change that information for every single sprite you have drawn.

01 = compression, don't worry about this, just set it to 01, you don't have to change this for other graphics.
122 64 = The Y and X size of the sprite. This is one of the reasons I use base sprites for my graphics, so I don't have to change those sizes all the time. In my case my sprite is 122 pixels high and 64 pixels wide.
-31 -91 = The X and Y positions of the upper-left corner of the sprite, relative to the "center" (usually negative). I think it is easier to explain this
with a picture:
relativeposition.png
relativeposition.png (21.2 KiB) Viewed 15122 times
This is also why I use base sprites, that way I also don't have to change that information. But if you have stationtiles with sizes that won't fit into your base sprites, this will give you an idea how to find that information.

And well, with the first line set I can repeat that for the other 3 sprites and i only have to change the X and Y positions of the upperleft corner, like
this:

Code: Select all

4 c:\grfmaken\grfcodecwin\tutorial\tutorial.pcx 88 7 01 122 64 -31 -91
5 c:\grfmaken\grfcodecwin\tutorial\tutorial.pcx 168 7 01 122 64 -31 -91
6 c:\grfmaken\grfcodecwin\tutorial\tutorial.pcx 248 7 01 122 64 -31 -91
Allrighty, we are halfway!!

Code: Select all

7 * 62	 00 04 02 01 00 08 "TUT0" 09 02 F4 03 00 00 00 00 00 10 05 03 2D 84 00 00 00 00 00 10 10 7A 2E 84 00 00 80 F3 03 00
 00 00 00 00 05 10 03 2F 84 00 00 00 00 00 10 10 7A 30 84 00 00 80
This is a very important line, It will define all kinds of properties to your station. There are loads of properties, which you can find at the NFO reference of which I gave the URL, but these are the basics for a stationtile that can be entered and driven through by trains (so for example you have to set different properties for buffers or stationtiles with no rails)

here we go:

7 * 62 = pseudospritenumber and how many bytes
00 = Action type. In this case, Action0
04 = Which type of feature you would like to change, 04 is station
02 = How many properties you would like to change per vehicle or station, in this case two. We are going to set the Class ID and the Spritelayout.I'll come back to that later. If you want to add more properties, don't forget to change this number accordingly!!
01 = How many vehicles/stations you would like to change. Just this one.
00 = The station-ID, this is an important number! You will have to change this number when you add more stationtiles. As this is the first it's number is 00, all next numbers are in hexadecimal! So for example your eleventh station doesn't have number 10 but 0A and so on.
08 "TUT0" = Class ID, the TUT0 refers to the action4 in line 12. This 4 letter and/or number combination has to be unique, just like your GRF-ID! By setting this property your stationset will show up in the stationmenu ingame. This is also useful if you want to have different types of stations in one set. So for example TUT0 has normal stations with no roof, TUT1 has stations with roofs, TUT2 has stations designed for cargo, whatever your imagination can think of ;-) It is just useful so that you can have different classes in your set and not everything under one name in the station menu.
09 02 F4 03 00 00 00 00 00 10 05 03 2D 84 00 00 00 00 00 10 10 7A 2E 84 00 00 80 F3 03 00 00 00 00 00 05 10 03 2F 84 00 00 00 00 00 10 10
7A 30 84 00 00 80 = Sprite layout, this will need a bit more explaining.

09 = property number 09, refers to sprite layout
F4 03 = groundsprite. This is a hexadecimal number that refers to the sprite in the OpenGFX baseset, in decimals it's number 1012, which is a grasstile with a diagonal rail in East-West direction. This sprite can change accordingly to the railtype you use, so that is why you didn't have to bother with drawing tracks in your stationgraphics. Furthermore, you can change this basetile to another tile if you want. So for example you have a stationbuilding with no rails, you could use a concrete slab from the baseset as a groundtile and so don't need to draw that.
00 00 00 00 00 10 05 03 2D 84 = spritedata of the backgroundsprite in the E-W direction. Well, this I dont really get myself ;-) Only thing I do know is that 10 05 03 refers to the boundingbox size in hexadecimal. I usually use these numbers for my background boundingbox, so 16 pixels long, 5 wide, 3 high.
00 00 00 00 00 10 10 7A 2E 84 = the same, but for the foreground sprite. For the boundingbox of the foregroundsprite I usually set it to the same size as the basesprite I used, so that I don't have to change these numbers anymore if I use the same basesprites, so in this case 16 pixels long, 5 wide, 122 high.
00 00 80 = a literal 80 ends the list of sprites for this tile
F3 03 00 00 00 00 00 05 10 03 2F 84 00 00 00 00 00 10 10 7A 30 84 00 00 80 = Same as above, but for the South-West direction. F3 03 is spritenumber 1011 in the base set, a grasstile with diagonal rails in S-W direction.

Don't worry too much about all these settings, If you have set the boundingboxes to the size you want, you only have to change the station-ID if you add more stations and maybe the class-ID if you want to add a new stationclass in the menu.

Pfew, done the big one! Let's do the rest.

Code: Select all

8 * 7	 02 04 00 00 01 00 00
I'm not exactly sure what this does ;-) My knowledge of the code is a bit limited. I only think that it has something to do with the way the graphics show up in the menu, just insert this line in your code and don't worry too much about it. You don't have to change anything here if you add another stationtile.

Code: Select all

9 * 7	 02 04 01 00 01 00 00
See above ;-)

Code: Select all

10 * 10	 03 04 01 00 01 FE 01 00 00 00
10 * 10 = pseudospritenumber and how many bytes
03 = Action 3, assigns graphics sets to feature IDs
04 = What type of feature the IDs refer to, 04 is station
01 = Number of IDs this action 3 associates graphics with, just the one
00 = The station-ID, the same number as the one stated in pseudosprite 7, just before the 08. As with that number, you will have to change this number everytime you add a new station.
01 FE 01 00 00 00 = All this has something to do with cargospecific graphics, what exactly I don't know.

Code: Select all

11 * 25	 04 48 FF 01 00 "ÅBasic station tile" 00
This line of code will provide the name of the stationtile that you can see in the menu under the graphics and also as a description if you use the ?-tool, the stationtype so to say.
11 * 25 = pseudospritenumber and how many bytes
04 = Action4, Defines station name
48 = What type of feature the IDs refer to, 48 is original strings.
FF = Languagefile, FF is default
01 = Number of consecutive strings to change, just the one
00 = The station-ID, the same number as the one stated in pseudosprite 7, just before the 08. As with that number, you will have to change this number everytime you add a new station.
"ÅBasic station tile" = The actual name that you will see in the menu under the graphics. I'm not entirely sure what the Å does, but I have seen it in many GRF's and I think it is to distinguish station type names from stationclass names, but I'm not sure ;-) But do use this symbol before the actual name!
00 = a final 00 to indicate the end of the string

And woohoo, the final one!!

Code: Select all

12 * 15	 04 48 FF 01 00 "ÄTutorial" 00
This line of code will provide the name of the stationclass that you can see in the menu and also as a description if you use the ?-tool. This also has a connection to the "TUT0" that was entered in line 7. This is useful because you only have to set this name once and for other stations that also have "TUT0", you don't have to repeat this line!
12 * 15 = pseudospritenumber and how many bytes
04 = Action4, Defines station name
48 = What type of feature the IDs refer to, 48 is original strings.
FF = Languagefile, FF is default
01 = Number of consecutive strings to change, just the one
00 = The station-ID, the same number as the one stated in pseudosprite 7, just before the 08. As with that number, you will have to change this number everytime you add a new station.
"ÄTutorial" = The actual name that you will see in the menu. I'm not entirely sure what the Ä does, but I have seen it in many GRF's and I think it is to distinguish stationclass names from station types names, but I'm not sure ;-) But do use this symbol before the actual name!
00 = a final 00 to indicate the end of the string

And that's it! Pretty easy hey, NOT! ;-)
But I will make it easy now, if you use my graphic basetiles you don't have to worry about a lot of settings, Ive done that all for you now ;-) Basically the only things you have to change are:

- line 0, the total number of lines you have in your code
- line 1, the GRF-ID, the name and the description
- lines 3 to 6, only the location of the graphics on your computer and the the X and Y position of the upperleft corner of the sprite in your graphicsfile.
- line 7, the station-ID and the class ID
- line 10, the station-ID
- line 11, the station-ID and the station type name
- line 12, the station-ID and the station class name

And here are some example codes if you add more stationtiles. As you can see it is just easy copypaste work with some small (but very important) changes,

I'll highlight the changes I made.

Example 1: Just one stationclass, with 3 different stationtypes. Adding more is simple copypaste work, you only have to change the Station-ID's, the
stationtype names, the X and Y positions, the number of bytes in the lines with the names, the linenumbers and the total number of lines in line 0:


// Automatically generated by GRFCODEC. Do not modify!
// (Info version 7)
// Format: spritenum pcxfile xpos ypos compression ysize xsize xrel yrel
0 * 4 20 00 00 00
1 * 38 08 07 "PJ" 00 00 "Tutorial version 0.0" 00
"By Quast65" 00
2 * 6 01 04 01 FF 04 00
3 c:\grfmaken\grfcodecwin\tutorial\tutorial.pcx 8 7 01 122 64 -31 -91
4 c:\grfmaken\grfcodecwin\tutorial\tutorial.pcx 88 7 01 122 64 -31 -91
5 c:\grfmaken\grfcodecwin\tutorial\tutorial.pcx 168 7 01 122 64 -31 -91
6 c:\grfmaken\grfcodecwin\tutorial\tutorial.pcx 248 7 01 122 64 -31 -91
7 * 62 00 04 02 01 00 08 "TUT0" 09 02 F4 03 00 00 00 00 00 10 05 03 2D 84 00 00 00 00 00 10 10 7A 2E 84 00 00
80 F3 03 00 00 00 00 00 05 10 03 2F 84 00 00 00 00 00 10 10 7A 30 84 00 00 80
8 * 7 02 04 00 00 01 00 00
9 * 7 02 04 01 00 01 00 00
10 * 10 03 04 01 00 01 FE 01 00 00 00
11 * 25 04 48 FF 01 00 "ÅBasic station tile" 00
12 * 15 04 48 FF 01 00 "ÄTutorial" 00
13 * 6 01 04 01 FF 04 00
14 c:\grfmaken\grfcodecwin\tutorial\tutorial.pcx 328 7 01 122 64 -31 -91
15 c:\grfmaken\grfcodecwin\tutorial\tutorial.pcx 408 7 01 122 64 -31 -91
16 c:\grfmaken\grfcodecwin\tutorial\tutorial.pcx 488 7 01 122 64 -31 -91
17 c:\grfmaken\grfcodecwin\tutorial\tutorial.pcx 568 7 01 122 64 -31 -91
18 * 62 00 04 02 01 01 08 "TUT0" 09 02 F4 03 00 00 00 00 00 10 05 03 2D 84 00 00 00 00 00 10 10 7A 2E 84 00 00
80 F3 03 00 00 00 00 00 05 10 03 2F 84 00 00 00 00 00 10 10 7A 30 84 00 00 80
19 * 7 02 04 00 00 01 00 00
20 * 7 02 04 01 00 01 00 00
21 * 10 03 04 01 01 01 FE 01 00 00 00
22 * 38 04 48 FF 01 01 "ÅBasic station tile with benches" 00
23 * 6 01 04 01 FF 04 00
24 c:\grfmaken\grfcodecwin\tutorial\tutorial.pcx 648 7 01 122 64 -31 -91
25 c:\grfmaken\grfcodecwin\tutorial\tutorial.pcx 728 7 01 122 64 -31 -91
26 c:\grfmaken\grfcodecwin\tutorial\tutorial.pcx 808 7 01 122 64 -31 -91
27 c:\grfmaken\grfcodecwin\tutorial\tutorial.pcx 888 7 01 122 64 -31 -91
28 * 62 00 04 02 01 02 08 "TUT0" 09 02 F4 03 00 00 00 00 00 10 05 03 2D 84 00 00 00 00 00 10 10 7A 2E 84 00 00
80 F3 03 00 00 00 00 00 05 10 03 2F 84 00 00 00 00 00 10 10 7A 30 84 00 00 80
29 * 7 02 04 00 00 01 00 00
30 * 7 02 04 01 00 01 00 00
31 * 10 03 04 01 02 01 FE 01 00 00 00
32 * 40 04 48 FF 01 02 "ÅBasic station tile with lampposts" 00


Example 2: Let's add another stationclass to the previous code. This time you also have to change the stationclass ID and it's description.

// Automatically generated by GRFCODEC. Do not modify!
// (Info version 7)
// Format: spritenum pcxfile xpos ypos compression ysize xsize xrel yrel
0 * 4 2B 00 00 00
1 * 38 08 07 "PJ" 00 00 "Tutorial version 0.0" 00
"By Quast65" 00
2 * 6 01 04 01 FF 04 00
3 c:\grfmaken\grfcodecwin\tutorial\tutorial.pcx 8 7 01 122 64 -31 -91
4 c:\grfmaken\grfcodecwin\tutorial\tutorial.pcx 88 7 01 122 64 -31 -91
5 c:\grfmaken\grfcodecwin\tutorial\tutorial.pcx 168 7 01 122 64 -31 -91
6 c:\grfmaken\grfcodecwin\tutorial\tutorial.pcx 248 7 01 122 64 -31 -91
7 * 62 00 04 02 01 00 08 "TUT0" 09 02 F4 03 00 00 00 00 00 10 05 03 2D 84 00 00 00 00 00 10 10 7A 2E 84 00 00 80 F3 03 00 00 00 00 00
05 10 03 2F 84 00 00 00 00 00 10 10 7A 30 84 00 00 80
8 * 7 02 04 00 00 01 00 00
9 * 7 02 04 01 00 01 00 00
10 * 10 03 04 01 00 01 FE 01 00 00 00
11 * 25 04 48 FF 01 00 "ÅBasic station tile" 00
12 * 15 04 48 FF 01 00 "ÄTutorial" 00
13 * 6 01 04 01 FF 04 00
14 c:\grfmaken\grfcodecwin\tutorial\tutorial.pcx 328 7 01 122 64 -31 -91
15 c:\grfmaken\grfcodecwin\tutorial\tutorial.pcx 408 7 01 122 64 -31 -91
16 c:\grfmaken\grfcodecwin\tutorial\tutorial.pcx 488 7 01 122 64 -31 -91
17 c:\grfmaken\grfcodecwin\tutorial\tutorial.pcx 568 7 01 122 64 -31 -91
18 * 62 00 04 02 01 01 08 "TUT0" 09 02 F4 03 00 00 00 00 00 10 05 03 2D 84 00 00 00 00 00 10 10 7A 2E 84 00 00 80 F3 03 00 00 00 00 00
05 10 03 2F 84 00 00 00 00 00 10 10 7A 30 84 00 00 80
19 * 7 02 04 00 00 01 00 00
20 * 7 02 04 01 00 01 00 00
21 * 10 03 04 01 01 01 FE 01 00 00 00
22 * 38 04 48 FF 01 01 "ÅBasic station tile with benches" 00
23 * 6 01 04 01 FF 04 00
24 c:\grfmaken\grfcodecwin\tutorial\tutorial.pcx 648 7 01 122 64 -31 -91
25 c:\grfmaken\grfcodecwin\tutorial\tutorial.pcx 728 7 01 122 64 -31 -91
26 c:\grfmaken\grfcodecwin\tutorial\tutorial.pcx 808 7 01 122 64 -31 -91
27 c:\grfmaken\grfcodecwin\tutorial\tutorial.pcx 888 7 01 122 64 -31 -91
28 * 62 00 04 02 01 02 08 "TUT0" 09 02 F4 03 00 00 00 00 00 10 05 03 2D 84 00 00 00 00 00 10 10 7A 2E 84 00 00 80 F3 03 00 00 00 00 00
05 10 03 2F 84 00 00 00 00 00 10 10 7A 30 84 00 00 80
29 * 7 02 04 00 00 01 00 00
30 * 7 02 04 01 00 01 00 00
31 * 10 03 04 01 02 01 FE 01 00 00 00
32 * 40 04 48 FF 01 02 "ÅBasic station tile with lampposts" 00
33 * 6 01 04 01 FF 04 00
34 c:\grfmaken\grfcodecwin\tutorial\tutorial.pcx 968 7 01 122 64 -31 -91
35 c:\grfmaken\grfcodecwin\tutorial\tutorial.pcx 1048 7 01 122 64 -31 -91
36 c:\grfmaken\grfcodecwin\tutorial\tutorial.pcx 1128 7 01 122 64 -31 -91
37 c:\grfmaken\grfcodecwin\tutorial\tutorial.pcx 1208 7 01 122 64 -31 -91
38 * 62 00 04 02 01 05 08 "TUT1" 09 02 F4 03 00 00 00 00 00 10 05 03 2D 84 00 00 00 00 00 10 10 7A 2E 84 00 00
80 F3 03 00 00 00 00 00 05 10 03 2F 84 00 00 00 00 00 10 10 7A 30 84 00 00 80
39 * 7 02 04 00 00 01 00 00
40 * 7 02 04 01 00 01 00 00
41 * 10 03 04 01 05 01 FE 01 00 00 00
42 * 35 04 48 FF 01 05 "ÅBasic station tile for cargo" 00
43 * 23 04 48 FF 01 05 "ÄTutorial extra's" 00

Please note that you can still add stations that are of the first class that we have defined, you can mix them up, that should cause no troubles.
Well that's it, start making graphics and .nfo's!! And if you want to code them, use GRFcodec. It can be found here: http://www.openttd.org/en/download-grfcodec As of yet I haven't found a tutorial for GRFcodec, maybe someone has found one, or is willing to write one, because I'm a bit done with typing now ;-)
Last edited by Quast65 on 05 Aug 2012 20:40, edited 4 times in total.
Projects: http://www.tt-forums.net/viewtopic.php?f=26&t=57266
Screenshots: http://www.tt-forums.net/viewtopic.php?f=47&t=56959
Scenario of The Netherlands: viewtopic.php?f=60&t=87604

Winner of the following screenshot competitions:
sep 2012, jan 2013, apr 2013, aug 2013, mar 2014, mar 2016, oct 2020
All my work is released under GPL-license (either V2 or V3), if not clearly stated otherwise.
User avatar
Quast65
Tycoon
Tycoon
Posts: 2664
Joined: 09 Oct 2011 13:51
Location: The Netherlands

Re: Station graphics and coding tutorial for dummies

Post by Quast65 »

Well to make the entire process complete, I think I should also write a tutorial on how to use GRFcodec. Again this is written from my experience, it might not be the most efficient way of doing it, but it works for me and might also work for you ;-)

First you'll need to download and install GRFcodec, it can be found here: http://www.openttd.org/en/download-grfcodec

Make sure to install it into a directory that has no spaces in its name (and also any other subdirectories should have no spaces)

I installed it on my c: drive in this directory c:/grfmaken/grfcodecwin (grfmaken is dutch for grfmaking) You are off course free to use any directory you want!

Next I made a subdirectory in which I am going to make the GRF. In this case I called it "tutorial" Here I placed my graphicsfile (tutorial.pcx) and I have written and saved my .nfo here (tutorial.nfo). I do realise now after a comment later on in this thread by Foobar that it is easier to use relative paths to the graphicsfiles in the NFO, but I'll stick to my original setup now.

Ok, we got our files, so time to fire up GRFcodec!

This is done by using the command prompt (I assume you have experience with that, if not, here is more documentation http://en.wikipedia.org/wiki/Command_Prompt ), I have made a screenshot of what I did in that and I will explain that below it:
grfcodec01.png
grfcodec01.png (31.69 KiB) Viewed 14993 times
Well when I open the command prompt I am not yet in the directory I want to be. As you can see I start out at my "home" directory:
c:/users/Pieter-Jan Vermunt, a couple of cd.. commands bring me to c:/
Now I can go to the directory where I have GRFcodec in, I do that with the following commands:

cd grfmaken, this brings me to c:/grfmaken
cd grfcodecwin, this brings me to c:/grfmaken/grfcodecwin and this is where I want to be, because I have my grfcodec.exe there ;-)

Now I can give the command to make the grf:

grfcodec -e tutorial/tutorial.grf c:/grfmaken/grfcodecwin/tutorial

I'll cut that up in pieces so you know what is what:

grfcodec = the command that you want to use grfcodec.exe
-e = the command you want to encode your files
tutorial/tutorial.grf = the relative path to the .nfo and what name you give to the .grf, please note that that name has to be the same as the name of your .nfo or grfcodec will not find it!
c:/grfmaken/grfcodecwin/tutorial = the path to the directory where you want your GRF to be placed.

As you can see, I get no errors, it says Done! and indeed I have a .grf in my directory now. This GRF can now be placed in your game folder where you keep your other GRF's and it will appear now in the new-grf menu in Openttd. If you have placed it while a game is still running (which is NOT, I repeat NOT advised to do), you might have to click on the "read files again" button on the bottom of the new-grf menu before it appears.

Now you should be able to use your GRF in your games, woohoo!!

And off course you are now able to post this GRF into a thread you create here in the forums, so others can enjoy your work too.
If you like others to be able to use your work, why not release it under GPLv2 licence? You can find out how you can do that here, I have also placed the files of my tutorial there: http://www.tt-forums.net/viewtopic.php? ... 0#p1038570

If you want to see what other features GRFcodec has type: grfcodec -h

Furthermore, as I stated in the codingtutorial, you can use grfcodec to count the numbers of bytes in your lines and also to count the total number of lines. I have made two deliberate mistakes in my .nfo, I have stated 10 lines, which is 0A in hexadecimal (should be 12, 0C in hexadecimal) and stated that line 12 has 10 bytes (should be 15)

So this is the incorrect code:

Code: Select all

// Automatically generated by GRFCODEC. Do not modify!
// (Info version 7)
// Format: spritenum pcxfile xpos ypos compression ysize xsize xrel yrel    
    0 * 4	 0A 00 00 00
    1 * 38	 08 07 "PJ" 00 00 "Tutorial version 0.0" 00
	 "By Quast65" 00
    2 * 6	 01 04 01 FF 04 00
    3 c:\grfmaken\grfcodecwin\tutorial\tutorial.pcx 8 7 01 122 64 -31 -91
    4 c:\grfmaken\grfcodecwin\tutorial\tutorial.pcx 88 7 01 122 64 -31 -91
    5 c:\grfmaken\grfcodecwin\tutorial\tutorial.pcx 168 7 01 122 64 -31 -91
    6 c:\grfmaken\grfcodecwin\tutorial\tutorial.pcx 248 7 01 122 64 -31 -91
    7 * 62	 00 04 02 01 00 08 "TUT0" 09 02 F4 03 00 00 00 00 00 10 05 03 2D 84 00 00 00 00 00 10 10 7A 2E 84 00 00 80 F3 03 00 00 00 00 00
 05 10 03 2F 84 00 00 00 00 00 10 10 7A 30 84 00 00 80
    8 * 7	 02 04 00 00 01 00 00
    9 * 7	 02 04 01 00 01 00 00
   10 * 10	 03 04 01 00 01 FE 01 00 00 00
   11 * 25	 04 48 FF 01 00 "ÅBasic station tile" 00
   12 * 10	 04 48 FF 01 00 "ÄTutorial" 00

As you can see GRFcodec warns me about those mistakes:
grfcodec02.png
grfcodec02.png (32.77 KiB) Viewed 14993 times
After I changed those mistakes I get no more errors.

And finally, you can also use GRFcodec to decode existing GRF's, in stead of the -e you put -d and offcourse you'll have to state where the .grf is located and where you want the graphicsfile and .nfo to go.
When checking the unpacked graphicsfile you might see that there are some strange pink colors. That will mean that GRFcodec has unpacked it in a wrong colorpalette. You will have to try the following two options:

c:/grfmaken/grfcodecwin/grfcodec -d tutorial/tutorial.grf c:/grfmaken/grfcodecwin/tutorial -p 1

or

c:/grfmaken/grfcodecwin/grfcodec -d tutorial/tutorial.grf c:/grfmaken/grfcodecwin/tutorial -p 2

-p 1 refers to DOS-palette, -p 2 refers to WINDOWS-palette. Either of those will give you a graphicsfile without those strange pink colors.

Be aware though that most projects are copyrighted!! So you can't always just freely use work from others in your projects!!

So that's it!
Last edited by Quast65 on 06 Aug 2012 15:10, edited 3 times in total.
Projects: http://www.tt-forums.net/viewtopic.php?f=26&t=57266
Screenshots: http://www.tt-forums.net/viewtopic.php?f=47&t=56959
Scenario of The Netherlands: viewtopic.php?f=60&t=87604

Winner of the following screenshot competitions:
sep 2012, jan 2013, apr 2013, aug 2013, mar 2014, mar 2016, oct 2020
All my work is released under GPL-license (either V2 or V3), if not clearly stated otherwise.
User avatar
FooBar
Tycoon
Tycoon
Posts: 6553
Joined: 21 May 2007 11:47
Location: The Netherlands
Contact:

Re: Station graphics and coding tutorial for dummies

Post by FooBar »

I've added a link to the tutorials section on the TT Wiki so that people can find this more easily once it drops down the topic list :)

May I also point you to the NewGRF Specs that is updated by OpenTTD developers here: http://newgrf-specs.tt-wiki.net/wiki/Main_Page
You're ofcourse free to use mb's personal version of the specs, but I'm not sure how often he updates it. At the moment his version is at least in some places outdated/incomplete.

Lastly I have a small suggestion: you can also use relative paths to graphic files, which makes the code portable between different computers. Usually sprites/filename.png is sufficient with default settings of grfcodec. And maybe more importantly: you can use png files now. These are smaller and more flexible than pcx files, as e.g. browsers can display them too.

Other than that: well done! I must admit that I haven't read it completely, but it looks to be very thorough!
Michi_cc
OpenTTD Developer
OpenTTD Developer
Posts: 619
Joined: 14 Jun 2004 23:27
Location: Berlin, Germany
Contact:

Re: Station graphics and coding tutorial for dummies

Post by Michi_cc »

Quast65 wrote:I mostly use the colors of the windows palette, as they have a bit more options especially in the grey tone area.
Maybe you should count again :) It's the windows palette that is missing colours, not the DOS palette.

-- Michael Lutz
User avatar
Quast65
Tycoon
Tycoon
Posts: 2664
Joined: 09 Oct 2011 13:51
Location: The Netherlands

Re: Station graphics and coding tutorial for dummies

Post by Quast65 »

LOL, you are right!
@Foobar, thnx for your kind words and linking this to the Wiki. And I'll change the URL to the specs that are more up to date.
Projects: http://www.tt-forums.net/viewtopic.php?f=26&t=57266
Screenshots: http://www.tt-forums.net/viewtopic.php?f=47&t=56959
Scenario of The Netherlands: viewtopic.php?f=60&t=87604

Winner of the following screenshot competitions:
sep 2012, jan 2013, apr 2013, aug 2013, mar 2014, mar 2016, oct 2020
All my work is released under GPL-license (either V2 or V3), if not clearly stated otherwise.
michael blunck
Tycoon
Tycoon
Posts: 5948
Joined: 27 Apr 2005 07:09
Contact:

Re: Station graphics and coding tutorial for dummies

Post by michael blunck »

The m4nfo User Manual available on that site contains a chapter about coding stations. This should be WAY more comprehensible than doing it in plain nfo.

regards
Michael
Image
User avatar
YNM
Tycoon
Tycoon
Posts: 3574
Joined: 22 Mar 2012 11:10
Location: West Java

Re: Station graphics and coding tutorial for dummies

Post by YNM »

I know this is a bit oriented to me :o
Aanyway, I'll just try to do what written and maybe asking again in my separate asking thread :)

Thank you Quast65 ! :wink:
YNM = yoursNotMine - Don't get it ?
「ヨーッスノットマイン」もと申します。
User avatar
Quast65
Tycoon
Tycoon
Posts: 2664
Joined: 09 Oct 2011 13:51
Location: The Netherlands

Re: Station graphics and coding tutorial for dummies

Post by Quast65 »

michael blunck wrote:The m4nfo User Manual available on that site contains a chapter about coding stations. This should be WAY more comprehensible than doing it in plain nfo.

regards
Michael
True, although it is always difficult if you have no or limited coding experience to work with those comprehensive manuals. The way I teached myself a bit about NFO coding was to look at many different examples (by decoding existing grf's with GRFcodec) and look at what the differences are and what recurring features there are. Then I checked that with the NFO-manual and so found out what those features mean. From this I derived some (for me) simple codes, which enabled me to code simple stations and objects, that I can easily change if I add new graphics to my GRF's.
As I had been able to do this without any coding experience at all, I wanted to share my experience in this thread, which might help others to step into the magic world of coding ;-)

But that said Michael, are there some grf's available that have been coded in m4nfo? I'm very interested in looking into that, especially to be able to make GRF's that are a bit more difficult to code in plain nfo (for example animated objects/stations, multiple tile stations, stations that are cargo aware, etc).
Projects: http://www.tt-forums.net/viewtopic.php?f=26&t=57266
Screenshots: http://www.tt-forums.net/viewtopic.php?f=47&t=56959
Scenario of The Netherlands: viewtopic.php?f=60&t=87604

Winner of the following screenshot competitions:
sep 2012, jan 2013, apr 2013, aug 2013, mar 2014, mar 2016, oct 2020
All my work is released under GPL-license (either V2 or V3), if not clearly stated otherwise.
User avatar
Quast65
Tycoon
Tycoon
Posts: 2664
Joined: 09 Oct 2011 13:51
Location: The Netherlands

Re: Station graphics and coding tutorial for dummies

Post by Quast65 »

Well, I've also placed a tutorial how to use GRFcodec on the third post, now it is time to really make it complete and make a little tutorial about how you can make your GRF be licenced under the GPLv2-licence.

This is fairly simple, next to your GRF, graphicsfile and NFO that you have already created you have to include a licence.txt (this is a standard file, you can use the one that I included here later in this post) and you can include a readme.txt (where you can be very elaborate in the information about your GRF, but mainly you can be elaborate about who participated in the creation, the credits so to say), also you could include a changelog.txt (where you can put information about what has been changed in a new version)

The way I do it is to combine the GRF and the .txt's into a ZIP-file. That way the most important information is always together and if a player unzips that file into his/hers games GRF-directory, this information will also show up ingame in the new-grf menu (at least in the most modern versions of Openttd)

Also this way you can post all your files using three attachments here in the forums (which is the maximum number of attachments you can have in a post here, if I am correct)

So here I go, tutorial is going to be GPLv2!!
Tutorial.zip
(9.07 KiB) Downloaded 281 times
tutorial.pcx
(7.98 KiB) Downloaded 300 times
tutorial.nfo
(986 Bytes) Downloaded 309 times
And just a little extra I want to state, is that the graphics and code I placed here is so very very basic, that I don't see the need of being credited if you use parts of that at all. I'd rather see loads of more new GRF's, I'm happy enough with that ;-)
Projects: http://www.tt-forums.net/viewtopic.php?f=26&t=57266
Screenshots: http://www.tt-forums.net/viewtopic.php?f=47&t=56959
Scenario of The Netherlands: viewtopic.php?f=60&t=87604

Winner of the following screenshot competitions:
sep 2012, jan 2013, apr 2013, aug 2013, mar 2014, mar 2016, oct 2020
All my work is released under GPL-license (either V2 or V3), if not clearly stated otherwise.
michael blunck
Tycoon
Tycoon
Posts: 5948
Joined: 27 Apr 2005 07:09
Contact:

Re: Station graphics and coding tutorial for dummies

Post by michael blunck »

Quast65 wrote: But that said Michael, are there some grf's available that have been coded in m4nfo? I'm very interested in looking into that, especially to be able to make GRF's that are a bit more difficult to code in plain nfo (for example animated objects/stations, multiple tile stations, stations that are cargo aware, etc).
Yes, there are (DBXL, NewStations, NewShips, DBRails, MariCo, GermanRV, French NG Set, ...). Unfortunately, the most interesting ones are quite large, and thus don´t fit as a tutorial. OTOH, the m4nfo user manual includes lots of smaller code examples derived from above sets, and in addition I´m in the process of writing a larger tutorial on "advanced" newobjects coding, to be released next door (Simuscape).

If there are any special questions, don´t hesitate to contact me by PM or mail.

regards
Michael
Image
User avatar
kamnet
Moderator
Moderator
Posts: 8589
Joined: 28 Sep 2009 17:15
Location: Eastern KY
Contact:

Re: Station graphics and coding tutorial for dummies

Post by kamnet »

Quast65 wrote:

Code: Select all

11 * 25	 04 48 FF 01 00 "ÅBasic station tile" 00
"ÅBasic station tile" = The actual name that you will see in the menu under the graphics. I'm not entirely sure what the Å does, but I have seen it in many GRF's and I think it is to distinguish station type names from stationclass names, but I'm not sure ;-) But do use this symbol before the actual name!
00 = a final 00 to indicate the end of the string

Code: Select all

12 * 15	 04 48 FF 01 00 "ÄTutorial" 00

"ÄTutorial" = The actual name that you will see in the menu. I'm not entirely sure what the Ä does, but I have seen it in many GRF's and I think it is to distinguish stationclass names from station types names, but I'm not sure ;-) But do use this symbol before the actual name!
00 = a final 00 to indicate the end of the string
Having (re)started hacking around in NFO again, thanks to the help of Michael Blunk, I've found that this is slightly incorrect. The Å and Ä characters are showing up because GRFCodec has incorrectly translated them. I've also seen them interpreted as other characters. They should be C5 and C4, respectively. The resulting code SHOULD look like this:

Code: Select all

11 * 25	 04 48 FF 01 00 C5 "Basic station tile" 00
12 * 15	 04 48 FF 01 00 C4 "Tutorial" 00
According to the NewGRF specs, under Action 4 offsets, C4 sets the station class ID text string, and C5 sets the station name ID text string.
michael blunck
Tycoon
Tycoon
Posts: 5948
Joined: 27 Apr 2005 07:09
Contact:

Re: Station graphics and coding tutorial for dummies

Post by michael blunck »

kamnet wrote:

Code: Select all

11 * 25	 04 48 FF 01 00 C5 "Basic station tile" 00
12 * 15	 04 48 FF 01 00 C4 "Tutorial" 00
According to the NewGRF specs [...] C4 sets the station class ID text string, and C5 sets the station name ID text string.
Small correction, "00 C4" sets the station class ID text string, and "00 C5" sets the station name ID text string. In both cases, the "00" refers to station-ID "0", i.e. for station-ID "3", "03 C5" would be needed as the text-ID. That´s what "0Cxx" wants to express in the docs.

regards
Michael
Image
User avatar
spajdy
Traffic Manager
Traffic Manager
Posts: 144
Joined: 28 Jan 2018 12:59

Re: Station graphics and coding tutorial for dummies

Post by spajdy »

Thanks for this tutorial. This is helpful. Bit of a crazy switch do NFO from NML but you made it easy to use, thanks for that.

Is there any way I can make my own custom bus stop? I tried looking for tutorial, or parameters or whatever what could be a little help. Nothing yet.
With best regards,
Špajdy.


My released NewGRFs:
ImageImageImage

You can find what I am planning next, or doing right now right in my developer diary.
Slovakia | lang : slovak | english

SLOVAK DISCORD SERVER I (and others Slovak and Czech creators) write there in Slovak about what I (ot they are) am planning. This invitation is valid for 100 users.
It is alive and well. :)
User avatar
kamnet
Moderator
Moderator
Posts: 8589
Joined: 28 Sep 2009 17:15
Location: Eastern KY
Contact:

Re: Station graphics and coding tutorial for dummies

Post by kamnet »

spajdy wrote: 20 Sep 2020 05:39 Thanks for this tutorial. This is helpful. Bit of a crazy switch do NFO from NML but you made it easy to use, thanks for that.

Is there any way I can make my own custom bus stop? I tried looking for tutorial, or parameters or whatever what could be a little help. Nothing yet.
At this time in official builds you cannot make custom bus stops. However, change is coming, there are coders who are working on making this happen. But unknown if or when that will become official.
User avatar
Quast65
Tycoon
Tycoon
Posts: 2664
Joined: 09 Oct 2011 13:51
Location: The Netherlands

Re: Station graphics and coding tutorial for dummies

Post by Quast65 »

kamnet wrote: 20 Sep 2020 06:14
spajdy wrote: 20 Sep 2020 05:39 Thanks for this tutorial. This is helpful. Bit of a crazy switch do NFO from NML but you made it easy to use, thanks for that.

Is there any way I can make my own custom bus stop? I tried looking for tutorial, or parameters or whatever what could be a little help. Nothing yet.
At this time in official builds you cannot make custom bus stops. However, change is coming, there are coders who are working on making this happen. But unknown if or when that will become official.
Glad this is helpful!
A more elaborate tutorial about stations can be found here:
http://www.simuscape.net/simutalk/viewt ... f=85&t=859
(registration may be required to read the thread)

With regards to the busstops, you can have your own custom made busstop, but only one design ;-)
By replacing the base-graphics with graphics of your busstop.

As Kamnet said, its sadly not (hopefully yet) possible to have several designs of busstops in one game.
Projects: http://www.tt-forums.net/viewtopic.php?f=26&t=57266
Screenshots: http://www.tt-forums.net/viewtopic.php?f=47&t=56959
Scenario of The Netherlands: viewtopic.php?f=60&t=87604

Winner of the following screenshot competitions:
sep 2012, jan 2013, apr 2013, aug 2013, mar 2014, mar 2016, oct 2020
All my work is released under GPL-license (either V2 or V3), if not clearly stated otherwise.
User avatar
spajdy
Traffic Manager
Traffic Manager
Posts: 144
Joined: 28 Jan 2018 12:59

Re: Station graphics and coding tutorial for dummies

Post by spajdy »

kamnet wrote: 20 Sep 2020 06:14
spajdy wrote: 20 Sep 2020 05:39 Thanks for this tutorial. This is helpful. Bit of a crazy switch do NFO from NML but you made it easy to use, thanks for that.

Is there any way I can make my own custom bus stop? I tried looking for tutorial, or parameters or whatever what could be a little help. Nothing yet.
At this time in official builds you cannot make custom bus stops. However, change is coming, there are coders who are working on making this happen. But unknown if or when that will become official.
Oh, thanks for you answer, okay so for now I can focus on making of buses, trolleybuses and trains and wait if this is gonna be a thing.
With best regards,
Špajdy.


My released NewGRFs:
ImageImageImage

You can find what I am planning next, or doing right now right in my developer diary.
Slovakia | lang : slovak | english

SLOVAK DISCORD SERVER I (and others Slovak and Czech creators) write there in Slovak about what I (ot they are) am planning. This invitation is valid for 100 users.
It is alive and well. :)
User avatar
spajdy
Traffic Manager
Traffic Manager
Posts: 144
Joined: 28 Jan 2018 12:59

Re: Station graphics and coding tutorial for dummies

Post by spajdy »

Quast65 wrote: 20 Sep 2020 09:37
kamnet wrote: 20 Sep 2020 06:14
spajdy wrote: 20 Sep 2020 05:39 Thanks for this tutorial. This is helpful. Bit of a crazy switch do NFO from NML but you made it easy to use, thanks for that.

Is there any way I can make my own custom bus stop? I tried looking for tutorial, or parameters or whatever what could be a little help. Nothing yet.
At this time in official builds you cannot make custom bus stops. However, change is coming, there are coders who are working on making this happen. But unknown if or when that will become official.
Glad this is helpful!
A more elaborate tutorial about stations can be found here:
http://www.simuscape.net/simutalk/viewt ... f=85&t=859
(registration may be required to read the thread)

With regards to the busstops, you can have your own custom made busstop, but only one design ;-)
By replacing the base-graphics with graphics of your busstop.

As Kamnet said, its sadly not (hopefully yet) possible to have several designs of busstops in one game.
Oh, I would be okay with one design, but I think I am gonna save me a trouble if there should be different approach to this. Anyway, I was scared of NFO before your tutorial, but you've made it as easy as possible. Thanks for that.

My first attempt to the station.
stanica.png
stanica.png (21.07 KiB) Viewed 7156 times
With best regards,
Špajdy.


My released NewGRFs:
ImageImageImage

You can find what I am planning next, or doing right now right in my developer diary.
Slovakia | lang : slovak | english

SLOVAK DISCORD SERVER I (and others Slovak and Czech creators) write there in Slovak about what I (ot they are) am planning. This invitation is valid for 100 users.
It is alive and well. :)
User avatar
spajdy
Traffic Manager
Traffic Manager
Posts: 144
Joined: 28 Jan 2018 12:59

Re: Station graphics and coding tutorial for dummies

Post by spajdy »

Quast65 wrote: 20 Sep 2020 09:37 Glad this is helpful!
A more elaborate tutorial about stations can be found here:
http://www.simuscape.net/simutalk/viewt ... f=85&t=859
(registration may be required to read the thread)
And thanks for the link :) this will be helpful in the future.
With best regards,
Špajdy.


My released NewGRFs:
ImageImageImage

You can find what I am planning next, or doing right now right in my developer diary.
Slovakia | lang : slovak | english

SLOVAK DISCORD SERVER I (and others Slovak and Czech creators) write there in Slovak about what I (ot they are) am planning. This invitation is valid for 100 users.
It is alive and well. :)
Nitrous69
Engineer
Engineer
Posts: 5
Joined: 30 Dec 2021 08:27
Contact:

Re: Station graphics and coding tutorial for dummies

Post by Nitrous69 »

Hello.

I have a little problem with making those station tiles. Every time I update the station-ID then in-game it shows me this:Image I tried to use several IDs but it still shows me that error. :?: I hope you can help me. :idea:Image
Attachments
OpenTTD 1.10.3 30.12.2021 10_32_42.png
(470.3 KiB) Not downloaded yet
.grfcodec_project.nfo - Notepad++.png
(45.32 KiB) Not downloaded yet
Post Reply

Return to “Graphics Development”

Who is online

Users browsing this forum: Ahrefs [Bot], Google Adsense [Bot], mrkastan and 76 guests