Page 1 of 1
Zephyris' Blender to Gimp to 2CC sprites workflow tools
Posted: 12 Aug 2009 20:37
by Zephyris
I have made a fair few complex vehicles in my time, and this is the workflow I use to make this a pain free process, from blender 3D model to an 8bpp sprite.
Blender
1. Model the vehicle, make sure it fits in the view of the camera
2. Render the 8 views with Ctrl+F12 (puts the images in C:\tmp)
GIMP
1. Image>Mode>Indexed (Convert to 2CC or 1CC conversion palette)
2. Image>Mode>RGB
3. Image>Mode>Indexed (Convert to TTD palette)
4. Fill Background with transparent blue
See attached for the blender template and gimp palette files.
Re: Zephyris' Blender to Gimp to 2CC sprites workflow tools
Posted: 13 Aug 2009 16:42
by lawton27
You can convert images straight to ttd pallate without drawing over them in gimp?
If I get gimp where do I download the ttd palate for it?
Re: Zephyris' Blender to Gimp to 2CC sprites workflow tools
Posted: 13 Aug 2009 18:48
by FooBar
The palette is included in Zephyris' zip file

Re: Zephyris' Blender to Gimp to 2CC sprites workflow tools
Posted: 13 Aug 2009 18:58
by lawton27
It's rather tricky getting the conversion right I think I'll stick to drawing in the palate for now, after allot of fiddling this looks ok but I doubt I'll do other angles unless it's really liked by someone, there's already plenty of streamliner sprites out there.
Re: Zephyris' Blender to Gimp to 2CC sprites workflow tools
Posted: 13 Aug 2009 19:38
by FooBar
I think it's a bit small compared to regular TTD engines
Re: Zephyris' Blender to Gimp to 2CC sprites workflow tools
Posted: 13 Aug 2009 19:47
by lawton27
FooBar wrote:I think it's a bit small compared to regular TTD engines
I agree, I was just tesing out a new style which makes use of the conversion to ttd palate technique I just learnt, I'll find a use for it somewhere
Re: Zephyris' Blender to Gimp to 2CC sprites workflow tools
Posted: 13 Aug 2009 19:58
by Zephyris
If you find renders are too dark (that one looks like it might be) try turning up the ambient occlusion and sun lamp power a little. You can also tweak the company colour brightness by adjusting the colourband for that material (see attached).
Re: Zephyris' Blender to Gimp to 2CC sprites workflow tools
Posted: 14 Aug 2009 07:54
by lead@inbox
Zephyris, please explain it - what is this
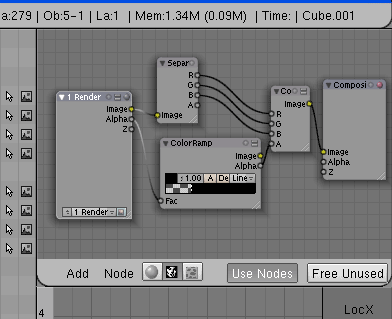
- 44.png (8.03 KiB) Viewed 3013 times
Re: Zephyris' Blender to Gimp to 2CC sprites workflow tools
Posted: 14 Aug 2009 07:57
by andythenorth
lawton27 wrote:It's rather tricky getting the conversion right I think I'll stick to drawing in the palate for now
The blender thing is a winner for ship and aeroplane hulls. For most vehicles / most buildings, pixels win

Re: Zephyris' Blender to Gimp to 2CC sprites workflow tools
Posted: 14 Aug 2009 11:15
by Zephyris
Zephyris, please explain it - what is this
That is the node setup used to allow anti-aliasing of internal details but prevent anti-aliasing of the edges of the objects. It acts to increase the "contrast" of the alpha channel so make what would otherwise be a smooth edge a sharp one.
Re: Zephyris' Blender to Gimp to 2CC sprites workflow tools
Posted: 14 Aug 2009 12:20
by lead@inbox
ok, now i see. You posted the very nice template
Re: Zephyris' Blender to Gimp to 2CC sprites workflow tools
Posted: 16 Aug 2009 10:47
by lead@inbox
Zephyris, please add materials that match this palette to your template (with ramps like for CC). i have some difficulties with this
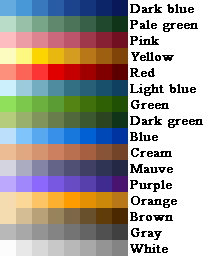
- playercolours.png (3.28 KiB) Viewed 2736 times
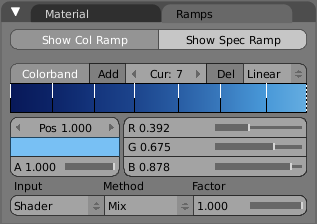
- AdjustColourband.png (12.53 KiB) Viewed 2741 times
Re: Zephyris' Blender to Gimp to 2CC sprites workflow tools
Posted: 16 Aug 2009 13:38
by Zephyris
Why do you need that? To preview the company colours in blender? I can do it but its quite fiddly and time consuming...
Re: Zephyris' Blender to Gimp to 2CC sprites workflow tools
Posted: 16 Aug 2009 22:12
by lead@inbox
as i understand - colors in render would be the same as in "show col ramps"?
Re: Zephyris' Blender to Gimp to 2CC sprites workflow tools
Posted: 17 Aug 2009 08:35
by Zephyris
Yup, exactly that. Each point on that colourband is one of the company colours so it precisely defines how the material appears when rendered.
The colourband works by overriding how a material would normally get shaded. If you created a simple blue texture then the highlights would be white, not light blue, and the shadows would be black, not dark blue. This changes it so the colourband takes the result of the shader and then instead of using the normal calculations, phong/fresnel/etc., uses this custom company-colour shading.
As a side note IIRC the GLSL shader can use the colourband for realtime display, try <shift>+z in the 3D view if you have a modern graphics card.
*edit* and here is the blender wiki page on it for further reading
http://wiki.blender.org/index.php/Doc:M ... ties/Ramps