[Mini-Guide] - How to make a train for Locomotion

Discuss, get help with, or post new modifications, graphics or related tools for Locomotion in this forum.

Moderator: Locomotion Moderators

Leone
Engineer
Engineer
Posts: 17
Joined: 25 Sep 2004 22:05

[Mini-Guide] - How to make a train for Locomotion

Post by Leone »

-------------------------------------------------------------------------------
-------------------------------------------------------------------------------
How i made the spanish 447 series train model for locomotion
-------------------------------------------------------------------------------
-------------------------------------------------------------------------------


This document try to bring some help to other modders who wants to model their own trains. I want to say thanks to the tt-forum users who posted some valuable info about locomotion and the models... And of course, thanks to Patchman, the author of locotool.

I need to say i don't write english very well, so feel free to modify the text making new versions with corrected phrases or pharagrahs or even the whole document ;)

Feel free to place this text where u want, but i would like that my nick appear like original author (just Leone xD) and the tt-forums as the source where the article was placed. Please copy this paragraph too (with corrected english if u want) in the text u take from here.

Ive atached a ZIP file containing all the figures and files i've used.

Well, lets work. I followed these steps to make the model:


---------------------------------------------------------------------------
1. Collect data (if u want :) )
---------------------------------------------------------------------------
Info about the train, some blueprints and so...


---------------------------------------------------------------------------
2. Modelling
---------------------------------------------------------------------------
I've done all 3d work in maya, but blender seems to be a very nice free 3D software. Texture the model and use metallic materials to give some reflections to the model trying to give it some realistic taste. There are huge modellng tutorials over Internet, but u dont need a high skill of 3D Design to make the model for the game.


---------------------------------------------------------------------------
3. Render your train
---------------------------------------------------------------------------

Well this is the hardest part. You need to place the camera at the rigth position and make several "shots" of the train at certain camera angles.


Placing the camera
------------------
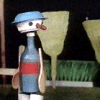
At first u need to make a ortographic camera in the scene and place it the side of the model. Center the model in the camera view and set the vertical view angle to about 40º pointing to the center of the model. Your view must be something like figure 1 shows.


Placing the ligths
------------------
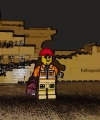
You need to place some ligths in the scene in order to make it seamless with the ligths and shadows in the game. I will tell the best i could the position of the objects. I've used the following light set (see figure 2):

1 Directional ligth (acting like the sun in the game)
-45º (x) -45º(Y) -> pointing to 45º left and 45º down. When you rotate the model 45ºccw it will have the more ligth in the viewable side. Set intensity to 100%

1 Point ligth to make the shadow zones brigther
Placed not too near of the model, at the same Y axis position of the train model (you can see the distance proportions in the top view of figure 3). Set intensity to 60%


Rotating and render the model
-----------------------------
Ive done this work in maya using a script to make the object rotate the exact angle and then make a "shot", rotate to next angle and make a "shot" and so... You can view the scripts in the atached file.

These are the angles i've used (all rotations starts at 45º):

----- Head -----

Ground level shots
64 shots (images 000 to 063)
vertical angle 0º
angle step = (360/64)

Medium up inclination
4 shots (images 064 to 067)
vertical angle 6º
angle step = 90º

Medium down inclination
4 shots (images 068 to 071)
vertical angle -6º
angle step = 90º

Full up inclination
32 shots (images 072 to 103)
vertical angle 12º
angle step = (360/32)

Full down inclination
32 shots (images 104 to 135)
vertical angle -12º
angle step = (360/32)


----- Motor carriage -----

Ground level shots
32 shots (images 000 to 031)
vertical angle 0º
angle step = (180/32)

Medium inclination
4 shots (images 032 to 035)
vertical angle 6º
angle step = 90º

Full inclination
32 shots (images 036 to 067)
vertical angle 12º
angle step = (360/32)


Render the model at high resolution, like 1600x1200 or more (later i'll tell u why), but with NO antialiasing to avoid that not totally transparent pixels at the edges of the model in the game.

Put the background of the image to the blue color to use it as transparent color later (blue: #0000FF)

Run the script in script editor and go to watch tv :) It will took 30-40 minutes in an XP2000+/512. After that u will see a couple of big images of the model in the directory u wrote in the script.


---------------------------------------------------------------------------
4. Tranform the rendered images
---------------------------------------------------------------------------

Well the next step is to tranform the images changing the actual palette to the Locomotion palette. And of course, reducing the image size.

I've used Adobe Photoshop CS to make this part in spanish, so the translation may be inaccurate.

I made an action, its like a macro that u can run in all the images of a directory. Record this steps in the action:

1 - Open one of the images u rendered
2 - Choose "Save for the Web" option in the File menu
3 - Choose PNG-8, and leave the rest by default (u can try to change for testing)
4 - in the color table tab, click on the small right arrow to the rigth of that small tab bar (not the one above the image) and choose load color table. Select loco.act (see the attached file).
5 - Shwitch to size tab and select 128x96 as the new size, and important, select the fist option in the quality droprown list (i use this in order to avoid edge graphic transparency errors). We rendered the images using so high resolution to make no jagged edged with no antialiasing, and this way we help Photoshop to do better the image resampling without a bilinear o similar interpolation algorithm, just pixel aproximation.
6 - Click Apply
7 - Save the image
8 - Close the image opened without saving changes

Stop recording the action. Now we will apply that macro to all the files in a folder:

1. File Menu -> "Automatice" -> Batch...
2. Select the new created action
3. Source: Folder, and select the folder the images are in
4. Destination: Save and close
5. Click OK


---------------------------------------------------------------------------
5. Making the DAT file
---------------------------------------------------------------------------

I've used the TGV DAT file as model. Extracted the images and the xml with locotool. Then replaced the images of the TGV with ones i created.

I modified the XML to place the graphics at the correct position setting the same xofs and yofs ONLY for all the images we created, leave the bogey images alone :) Modify the options u need and put these values for the sprites of all the images we created:

<sprite id="0" xofs="-63" yofs="-57">

Adjust that numbers to your model, but all the images need to be the same xofs and yofs (except the bogey ones like i said before)

You will need to adjust the bogey position and the distance between bogeys. Ive used these options:

<variable name="length" size="1">50</variable>
<unknown name="field_1" size="1">32</unknown>

<variable name="bogeypos" size="1">160</variable>

(extracted from xml generated by locotool 0.4)


---------------------------------------------------------------------------
6. Play the new model
---------------------------------------------------------------------------

At last, test if your model have the aspect u want, and then share with us! ;)
Attachments
files.zip
All the files zipped
(66.93 KiB) Downloaded 523 times
Last edited by Leone on 11 Oct 2004 21:04, edited 1 time in total.
User avatar
Steve
Tycoon
Tycoon
Posts: 2085
Joined: 10 Jan 2004 20:19
Location: London
Contact:

Post by Steve »

It would be nice if you could also add a similar thing to this to the Wiki.
http://wiki.locomotiondepot.net/
Then you can link to other pages, and people can view it easier (rather than stickying or bumping this)
Horse
Transport Coordinator
Posts: 325
Joined: 10 Sep 2004 20:25

Post by Horse »

After several hours trying Blender i only made this.
A box.

It will take a lot of time before i can make a simple model.

Is there a more easier way to paint a train.
Attachments
BLENDER1.JPG
BLENDER1.JPG (80.19 KiB) Viewed 11067 times
Horse
Transport Coordinator
Posts: 325
Joined: 10 Sep 2004 20:25

Post by Horse »

When you have a lot of fantasy you will see a modern locomotive.
But it is a shame.

This is not nice work but frustating.
Attachments
Blender2.JPG
Blender2.JPG (78.48 KiB) Viewed 11065 times
Horse
Transport Coordinator
Posts: 325
Joined: 10 Sep 2004 20:25

Post by Horse »

With this few information you give it is impossible for a beginner to make anything.

I have problems with making model in blender.
Only i get is a black box.

And when i would rendering that box i have only one picture of the box.
I need more of 100 in different angles.

This is frustratde and i get nothing.
It will take months before i have one carriage
it is so diffecult and only i went is making a train but it takes months before i know how it works.

expect no trains from me i can make only black boxes.
User avatar
PikkaBird
Graphics Moderator
Graphics Moderator
Posts: 5602
Joined: 13 Sep 2004 13:21
Location: The Moon

Post by PikkaBird »

Horse wrote:With this few information you give it is impossible for a beginner to make anything.
There are literally thousands of 3d modelling tutorials out there.
User avatar
Johns_Volition
Traffic Manager
Traffic Manager
Posts: 141
Joined: 06 Sep 2004 17:31
Location: Under the blue skys of Alabama
Contact:

Post by Johns_Volition »

It's a nice box by the way... just keep on doing!
-
whatever

"The universe would disappear in a puff of logic!"
-Patchman MMIV A.D.
User avatar
Hyronymus
Tycoon
Tycoon
Posts: 13233
Joined: 03 Dec 2002 10:36
Location: The Netherlands
Contact:

Post by Hyronymus »

Horse wrote:With this few information you give it is impossible for a beginner to make anything.
If you're blaming Leone for not helping you enough you may find it helpful to be reminded of how wrong you are. If you hope Leone can help you some more I think you may find it reassuring that it can be distracted from what you wrote. You did use a bit or harsh overtone though. Now nobody said 3D-drawing is easy (compare it to life if you like) and you shoud keep practising. Maybe an engine is a bit much if this is your first attempt at 3D-drawing. Try something smaller, choose a bus or something.
Horse
Transport Coordinator
Posts: 325
Joined: 10 Sep 2004 20:25

Post by Horse »

No i,am Blaming myself that i can make only a black box.
That you that wrong understood is the fault of mine bad English
Or maybe yours. or from us together.
I see you come from the Netherlands i too.
I can say it more clear in dutch.
But this is an International forum so i must try say it in englisch

And when Leon is angry on me he must believe i,am not making blaming on him.

But you are richt i can better try a bus.
I will see on the internet i can find a simple bus with less dificult components.
A box bus.
User avatar
Hyronymus
Tycoon
Tycoon
Posts: 13233
Joined: 03 Dec 2002 10:36
Location: The Netherlands
Contact:

Post by Hyronymus »

Hehe, try a Mercedes O-type bus. Not that fancy :p. But really, start with something simple. Satisfaction comes earlier which stimulates you to widen your scope.
Leone
Engineer
Engineer
Posts: 17
Joined: 25 Sep 2004 22:05

Post by Leone »

I'm not feel annoyed by the horse comments because i realised that he dont write good english like me :) (i would like to do it like i write spanish ;))

Some years ago i made some 3D models with maya and thats why i could do this model and texture it. Its a simple model, about a big box but with some work in texturing. I spent more time working in photoshop with the textures than modelling in maya.

The only thing i dont know if can be done do in other 3D apps is the rotation of the model to specified angles with a script or some automated process. You can do it manually, but i think its a waste of time because i made several renderings to make the model more real.

I dont know how to work in blender (i've installed it before using maya, but cant do anything with it, so i used maya cos i worked with it before)

Steve, I think this guide could be much better, but i haven´t enough time to do it. You can copy&paste this thread or link to this thread or something to point to this text from locomotion wiki. Btw i will try to post there this weekend....

And the last thing i would like to know if this guide is really useful for people, if there is someone making new vehicles for locomotion and if so, if they could write some words on the steps they used to make a really useful and better guide to make new trains.

I really like to see a locomotion rail network with lots of the 447 series i see everyday while going to work... :)
Leone
Engineer
Engineer
Posts: 17
Joined: 25 Sep 2004 22:05

Post by Leone »

I forgot to say to forum admins if you think this thread is useful it may be a good idea to make it "postit". Thanks :)
Horse
Transport Coordinator
Posts: 325
Joined: 10 Sep 2004 20:25

Post by Horse »

I have got a begin, i,am building a Double decker Carriege.
It is not a real one it is a fantasy model.
And it seems funny not a super model.
I have only the black start.
Now i,am trying to make windows and doors.

When it is finished i will upload it to my webspace.
Attachments
Double decker black.JPG
(89.11 KiB) Downloaded 313 times
Pedro
Engineer
Engineer
Posts: 20
Joined: 03 Nov 2003 17:25
Location: Madrid, Spain

Post by Pedro »

Thank you Leone for your lessons. I'm not used to any 3D program since I modeled somethings in Autocad 12....

I'd like to add some other spanish material, but I'll start with a single thhing before I do it. I think it wil take me some moeth before I can send any interesting work.

Anyway Thanks a lot,

PD. Con lo fácil que es decir Gracias por tus explicaciones!!! (translation: with the easy that it's saying thanks for the explanations!)
Horse
Transport Coordinator
Posts: 325
Joined: 10 Sep 2004 20:25

Post by Horse »

I have some colors yet, the colors are not so good on the moment, and the train seems as an Toyland object.
Attachments
On working yet.JPG
(100.45 KiB) Downloaded 265 times
Halalko
Engineer
Engineer
Posts: 24
Joined: 21 Sep 2004 15:31

Post by Halalko »

Leone wrote:The only thing i dont know if can be done do in other 3D apps is the rotation of the model to specified angles with a script or some automated process. You can do it manually, but i think its a waste of time because i made several renderings to make the model more real.
There is always more than one way to skin a cat ;)

A simple way is just to make an animation of the spinning object, and then render the animation in single frames.... Should be possible with most 3d modellers (if they supports animation and rendering of course :lol: ).....
Andreas "Halalko" Møller
Jack_Pokerface
Engineer
Engineer
Posts: 6
Joined: 12 Oct 2004 20:43
Location: Holland

3d programs

Post by Jack_Pokerface »

I am a student construction engeneer and at school we use a 3d program Inventor i made a 3d design of a 2 dek train in 5 min :P . it is very handy the only prblem is it is a proffesional program, so very expensiv :x . I am wondering if there are more people work with this program. a preview of a part of the train, below
Attachments
Bovenstel.jpg
Bovenstel.jpg (23.96 KiB) Viewed 1222 times
Horse
Transport Coordinator
Posts: 325
Joined: 10 Sep 2004 20:25

Post by Horse »

Wow that seems a lot better than my picture.
That,s a more realistic model.

But i cant,t make my picture in game i only hav a 3D model made in Blender.
but now i can,t converse it for locomotion
Jack_Pokerface
Engineer
Engineer
Posts: 6
Joined: 12 Oct 2004 20:43
Location: Holland

Post by Jack_Pokerface »

I just finist a new chemical tanker, and i would like to add this to loco. I wonder if it is possible to add a train to locomotion and not modifie a existing one? oh and her is my tanker train.
Attachments
Train.PNG
Train.PNG (70.7 KiB) Viewed 1211 times
User avatar
Villem
Tycoon
Tycoon
Posts: 3310
Joined: 28 Aug 2003 09:38

Post by Villem »

if you could bother read some posts, they would tell you can add completely new trains. :roll:
Locked

Return to “Locomotion Graphics, Modifications & Tools”

Who is online

Users browsing this forum: No registered users and 21 guests